一、https证书
1.1 https是什么?
- http ove tls 通过tls协议对数据进行加密
1.2 https的使用
- 通过创建的证书对数据传输进行加密
- 证书(公钥(证书),私钥)
- 公钥(证书):公共的大家都可以看见,类似锁头
- 私钥:类似于钥匙
1.3创建https证书
| 方案 | 说明 | 使用建议 |
|---|---|---|
| 企业使用,创建与购买 | 免费(3个月),收费 | 个人,企业推荐 |
| 个人手搓,自己用命令创建 | 免费,时间最多可以100年 | 不被用户浏览器识别,会有警告信息,企业内网环境 |
- 去购买域名的地方,阿里云ssl
- 证书加密级别加密
- 证书购买分类:
- 给三级域名创建 www.firy.cn blog.firy.cn live,firy.cn
- 通配符域名证书 *.firy.cn
1.4https证书配置
#创建子配置文件
vim /etc/nginx/conf.d/ssl.oldboy.cn.conf
#内容
server {
listen 443 ssl;
server_name ssl.oldboy.cn lidao.oldboy.cn;
root /app/code/ssl;
ssl_certificate /etc/nginx/keys/ssl.oldboy.cn.pem;
ssl_certificate_key /etc/nginx/keys/ssl.oldboy.cn.key; location / {
index index.html;
}
}
#检查并重新启动nginx
nginx -t
systemctl restart nginx
#创建目录
mkdir -p /app/code/ssl
#创建index.html文件
echo ssl.oldboy.cn >> /app/code/ssl/index.html
#创建目录
mkdir /etc/nginx/keys
#将证书配置站点压缩包放入该目录然后解压
#本地hosts解析
#访问域名与证书
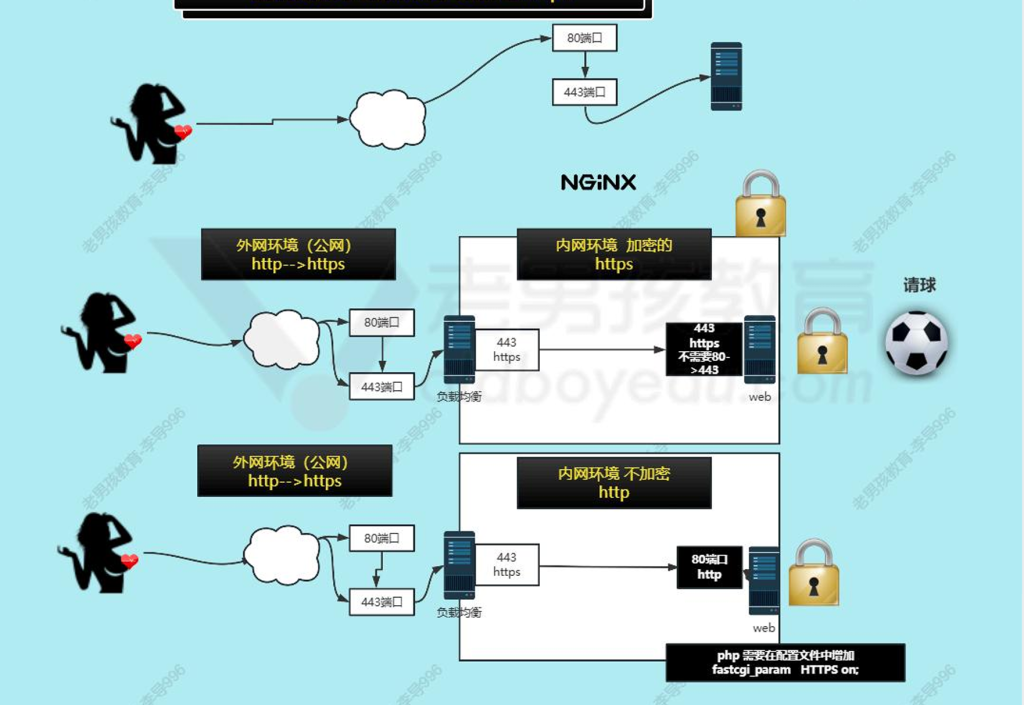
1.5htt跳转https
- 用户直接请求https(https)
- 用户请求http(80)–跳转–https(443)
#进入子配置文件
vim /etc/nginx/conf.d/ssl.oldboy.cn.conf
#内容·
server {
listen 80;
server_name ssl.oldboy.cn;
return 302 http://ssl.oldboy.cn$request_uri;
#http://ssl.oldboy.cn/lidao.oldboy.cn
# $request_uri
}
server {
listen 443 ssl;
server_name ssl.oldboy.cn lidao.oldboy.cn;
root /app/code/ssl;
ssl_certificate /etc/nginx/keys/ssl.oldboy.cn.pem;
ssl_certificate_key /etc/nginx/keys/ssl.oldboy.cn.key;
location / {
index index.html;
}
}
#检查并重新启动nginx
nginx -t
systemctl restart nginx
#网站访问http://ssl.oldboy.cn会发现它会自动跳转为https://ssl.oldboy.cn
或使用git bash中curl测试(电脑桌面右键点击更多选择git bash)
curl -Lv http://ssl.oldboy.cn
或在Linux中查看
curl -Lv -H Host:ssl.oldboy.cn http://10.0.0.7
1.6 tomcat配置https与自动跳转
- 更加推荐在ngx配置https
- 参考官网进行配置 SSL 证书 SSL 证书部署到服务器(CVM)概览_腾讯云11
1.7集群与https
#进行编辑子配置文件
vim /etc/nginx/conf.d/blog.oldboy.cn.conf
#内容:
upstream blog_group {
server 10.0.0.7:443;
#server 10.0.0.8:443;
}
server {
listen 80;
server_name blod.oldboy.cn;
return 302 https://blog.oldboy.cn$request_uri;
}
server {
listen 443 ssl;
server_name blod.oldboy.cn;
ssl_certificate /etc/nginx/keys/www.firy.cn_bundle.pem;
ssl_certificate_key /etc/nginx/keys/www.firy.cn.key;
location / {
proxy_pass http://blog_group;
proxy_set_header Host $http_host;
proxy_set_header X-Forwarded-For $proxy_add_x_forwarded_for;
proxy_set_header X-Real-Ip $remote_addr;
}
}
#创建keys目录
#下载证书文件拖入目录并解压
#检查并重新启动nginx
nginx -t
systemctl restart nginx
#编辑子配置文件
vim /etc/nginx/conf.d/blog.oldboy.cn.conf
#内容:
server {
listen 443 ssl;
server_name blog.oldboy.cn;
root /app/code/blog;
ssl_certificate /etc/nginx/keys/www.firy.cn_bundle.pem;
ssl_certificate_key /etc/nginx/keys/www.firy.cn.key;
location / {
index index.php index.html;
}
location ~* \.php$ {
fastcgi_pass 127.0.0.1:9000;
fastcgi_param SCRIPT_FILENAME $document_root$fastcgi_script_name;
include fastcgi_params;
}
}
#创建keys目录
#下载证书文件拖入目录并解压
#检查并重新启动nginx
nginx -t
systemctl restart nginx
- 最后在电脑中hosts解析
- 10.0.0.7 blog.oldboy.cn
二、高可用
- 让服务(主备)主节点宕机,备节点可以接管,网站一直用
- 目前最主要使用keepalived
- 之前还有heartbeat
- keepalived基于vrrp协议
- VRRP虚拟路由冗余协议,最开始给网络设备
- 主备2个节点,主节点不断向备节点发送消息,心跳消息(存活报告)
#安装
yum -y install keepalived
/etc/keepalived/keepalived.conf 配置文件
keepalived默认给lvs准备了配置文件,lvs做高可用
yum -y install keepalived
/etc/keepalived/keepalived.conf 配置文件
keepalived默认给lvs准备了配置文件,lvs做高可用
- 配置说明
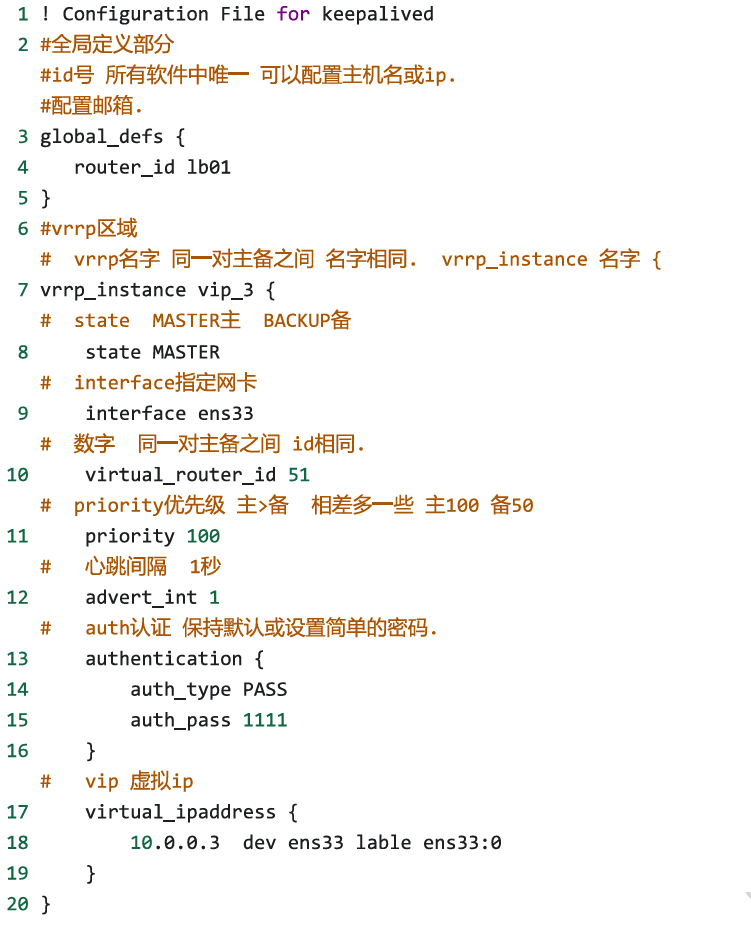
! Configuration File for keepalived
global_defs {
router_id lb01
}
vrrp_instance vip_3 {
state MASTER
interface ens33
virtual_router_id 51
priority 100
advert_int 1
authentication {
auth_type PASS
auth_pass 1111
}
virtual_ipaddress {
10.0.0.3 dev ens33 lable ens33:0
}
}
启动
systemctl enable –now keepalived.service
检查
hostname -I
发现有10.0.0.3
! Configuration File for keepalived
global_defs {
router_id lb02
}
vrrp_instance vip_3 {
state BACKUP
interface ens33
virtual_router_id 51
priority 50
advert_int 1
authentication {
auth_type PASS
auth_pass 1111
}
virtual_ipaddress {
10.0.0.3 dev ens33 lable ens33:0
}
}
启动
systemctl enable –now keepalived.service
检查
hostname -I
发现没有10.0.0.3
- 最后检查
把lb01的keepalived关闭
systemctl stop keepalived.service
结果:
lb中10.0.0.3消失,lb02中出现10.0.0.3
systemctl stop keepalived.service
结果:
lb中10.0.0.3消失,lb02中出现10.0.0.3